


So you want a tangy, crusty, bakery-style loaf like gluten free sourdough bread without the gluten drama? Excellent choice. This recipe gives you that classic sourdough vibe, but skips the wheat and the emotional damage that usually comes with gluten-free baking. It’s chewy, flavorful, and pleasantly dramatic in the oven, which is really all bread should aspire to be.
The best part? You do not need wizard skills. You just need a lively sourdough starter, a few smart ingredients, and the patience to let the loaf cool before slicing. Yes, that last part is personal.
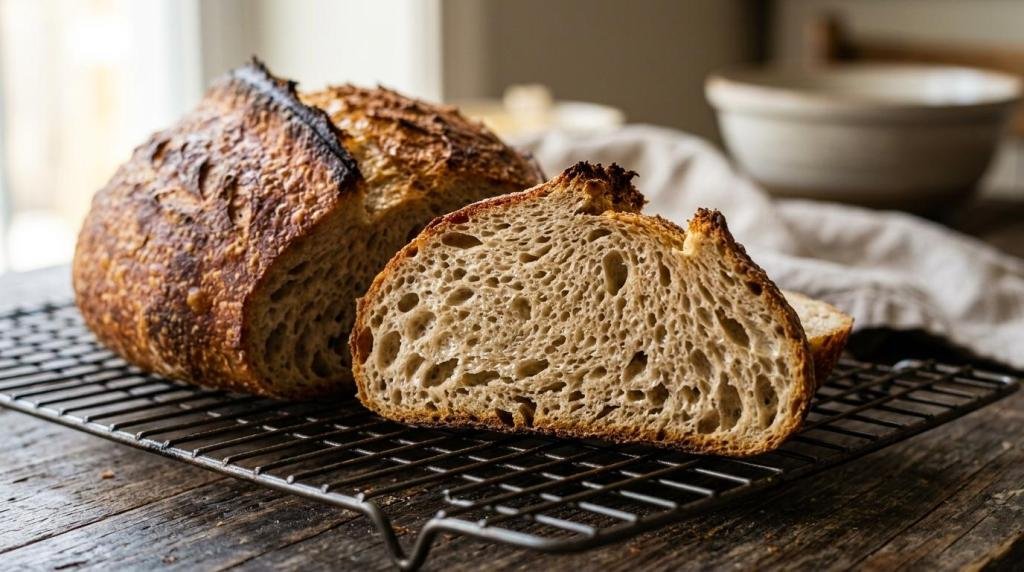
Why This Gluten-Free Sourdough Recipe Is Awesome
Regular sourdough gets to rely on gluten for stretch, lift, and that smug little open crumb. This version has to work harder, and honestly, it still pulls it off beautifully. Psyllium husk gives the dough structure, the starter brings that signature tang, and the flour blend keeps the texture pleasantly bread-like instead of weirdly cake-adjacent.
It’s also flexible. Shape it into a rustic boule, bake it in a loaf pan, or keep things simple and go for whatever form looks least likely to stress you out. The crust gets crisp, the inside stays tender, and the flavor deepens even more on day two.
A few more reasons this loaf earns a repeat bake:
- Crispy crust
- Tangy flavor
- Freezer-friendly
- Actually sliceable
- Beginner-friendly: The dough is sticky, but not impossible
- Meal-prep worthy: It holds up well for toast, sandwiches, and soup nights
- Fancy without effort: People assume you know what you’re doing
Ingredients You’ll Need for a Gluten-Free Sourdough Loaf
This recipe keeps the ingredient list practical, not absurdly niche. If your pantry already leans gluten-free, you’re probably halfway there.
Here’s what to grab:
- 100 grams active gluten-free sourdough starter
- 350 grams warm water
- 20 grams whole psyllium husk
- 200 grams brown rice flour
- 150 grams sorghum flour
- 100 grams tapioca starch
- 50 grams potato starch
- 10 grams fine sea salt
- 15 grams olive oil
- 10 grams maple syrup or sugar
- 1 teaspoon baking powder, optional for extra lift
Quick tip: use a kitchen scale if you can. Gluten-free baking loves precision and punishes chaos.
Step-by-Step Instructions for Homemade Gluten-Free Sourdough
This dough will look different from wheat dough. No dramatic windowpane test, no stretchy gluten strands, no need to pretend you’re on a baking show. Think thick batter-meets-soft-dough, and you’re in the right zone.
Before you start, here’s a handy proofing guide:
| Kitchen temp | Approximate proof time | What to look for |
|---|---|---|
| 75 to 78°F | 3 to 4 hours | Puffier dough, slight dome, a few surface bubbles |
| 70 to 74°F | 4 to 6 hours | Noticeable rise, softer texture |
| 65 to 69°F | 6 to 8 hours | Slower rise, more tangy flavor |
| Overnight in fridge | 8 to 12 hours | Mild rise, easier scheduling |
Now the actual baking part:
- Feed your starter and wait until it looks active and airy. If it barely moves, your loaf will also barely move. Harsh, but fair.
- Stir the warm water and psyllium husk together in a large bowl. Let it sit for 5 minutes until it thickens into a gel. It looks a little odd, but it’s doing excellent work.
- In another bowl, whisk together the brown rice flour, sorghum flour, tapioca starch, potato starch, salt, and baking powder if using. Mix well so you don’t get surprise pockets of starch later.
- Add the starter, olive oil, and maple syrup to the psyllium gel. Stir until combined, then add the dry ingredients. Mix thoroughly with a spoon or dough whisk until no dry patches remain.
- Let the dough rest for 10 minutes. This gives the flours time to hydrate and makes the dough easier to shape. Gluten-free dough appreciates a brief pause, and frankly, so do most people.
- Shape the dough with damp hands into a round or oval loaf. Place it in a parchment-lined bowl or banneton, seam side up, or press it into a lined loaf pan if you want a simpler path to success.
- Cover and let it proof until slightly puffy. Don’t wait for it to double like wheat dough, because it probably won’t, and that’s normal. You’re looking for visible expansion, not a miracle.
- Preheat your oven to 475°F with a Dutch oven inside, if using. If you’re baking in a loaf pan, just preheat the oven normally and place a metal pan on the lower rack for steam.
- Turn the loaf onto parchment, score the top with a sharp knife, and transfer it carefully into the hot Dutch oven. Bake covered for 20 minutes, then reduce the heat to 425°F, uncover, and bake 30 to 35 minutes more.
- Cool the loaf completely on a rack for at least 2 hours. Do not slice it hot. I know. The smell is rude. Still, wait.
Common Mistakes to Avoid With Gluten-Free Sourdough
This gluten free sourdough bread is forgiving, but not that forgiving. A few little mistakes can turn your beautiful loaf into a dense brick or a gummy science project.
Keep an eye out for these classics:
- Using a sleepy starter: If your starter isn’t bubbly and active, the loaf won’t rise well
- Skipping the psyllium: This is not the moment to get rebellious
- Adding random extra flour: Sticky dough is normal, and over-flouring makes the crumb dry
- Underbaking the loaf: Pale bread with a wet center is not charming
- Slicing too soon: Steam trapped inside the loaf needs time to settle, or the crumb turns gummy
One more thing: proofing too long can be just as annoying as not proofing enough. If the dough starts sinking or looks overly fragile, it may have gone past its sweet spot.
Alternatives and Substitutions for This Sourdough Recipe
Maybe you’re out of one flour. Maybe your store had exactly zero sorghum flour because life likes plot twists. Good news: you’ve got options.
Try these swaps without wrecking the whole loaf:
- Sorghum flour: Use oat flour or millet flour for a mild flavor
- Brown rice flour: White rice flour works, though the loaf may taste a bit lighter
- Potato starch: Cornstarch can step in if needed
- Maple syrup: Honey or plain sugar both work fine
- Dutch oven: Bake in a loaf pan for easier handling and fewer theatrics
IMO, sorghum gives the nicest flavor, while oat flour makes the crumb a little softer. If you swap several ingredients at once, though, don’t be shocked if the texture changes. Bread notices everything.
Gluten-Free Sourdough FAQ
Can I make this loaf without psyllium husk?
Not if you want it to behave like bread. Psyllium gives structure and elasticity that gluten would normally handle. Without it, the loaf tends to crumble or collapse, which is not the bold artisanal statement we’re after.
Do I need a Dutch oven?
Nope. It helps trap steam and creates a better crust, but a loaf pan works very well too. If you use a loaf pan, add steam by placing a hot pan of water on the lower rack for the first part of baking.
Why is my loaf gummy inside?
Usually one of three reasons: underbaked, sliced too early, or too much moisture in the dough. Start by baking it a bit longer and checking that the center feels set. Then, painful as it is, let it cool all the way.
Can I leave out the baking powder?
Yes. The loaf can rise on starter alone if your starter is strong. The baking powder just gives it a little extra insurance, which is nice when gluten-free dough decides to be dramatic.
How should I store it?
Let it cool completely, then store it wrapped at room temperature for up to 2 days. After that, slice and freeze it. Toasting from frozen works like a charm, FYI.
Can I make this recipe vegan?
It already is, as written. No eggs, no dairy, no weird surprises. Just good bread doing its job.
Can I use one all-purpose gluten-free flour blend instead of the separate flours?
You can try, but results vary a lot. Some blends contain xanthan gum, some don’t, and starch levels are all over the place. If you want the most reliable loaf, stick with the listed flour mix the first time.
Fresh from the oven, toasted the next day, slathered with vegan butter, piled with avocado, dunked into soup, turned into the best gluten free sourdough bread toast of your week, this loaf earns its keep. So go feed that starter, flour the counter a little less than you think, and make a loaf that tastes like you absolutely had your life together today.


